

In this BZ I will tell you how I implemented the work of DRL
The article was written a long time ago, but I am publishing it only now.
Since the introduction of the law on DRLs, many have not steamed and just turned on the dipped beam or tumanki as daylight, someone forgot to turn it on and drove without light, but then they came up with fines and started to tear for it.
I immediately realized that every time I turn it on and then remember to turn it off, I can’t. Yes, and the law says that DRL should glow when moving. I stumbled upon a discussion of this topic on the auto-lodge forum, there was a heated debate on how to turn on, save electricity, do not forget to turn off, different switching schemes were laid out and so on. Then this thread of discussion was safely cheated, but I remembered for myself the main important principle of the DRL:
-Work only with the engine running (just turning on the ignition is not suitable for me) so as not to discharge the battery.
— Turn off when the dipped beam / dimensions
— Do not attract attention if it’s just wound up, at startup, for example, — the car is standing and not moving, so it shouldn’t light up, and you’re warming in it or something else …
The scheme consists of a minimum of detail and can be done by almost everyone.
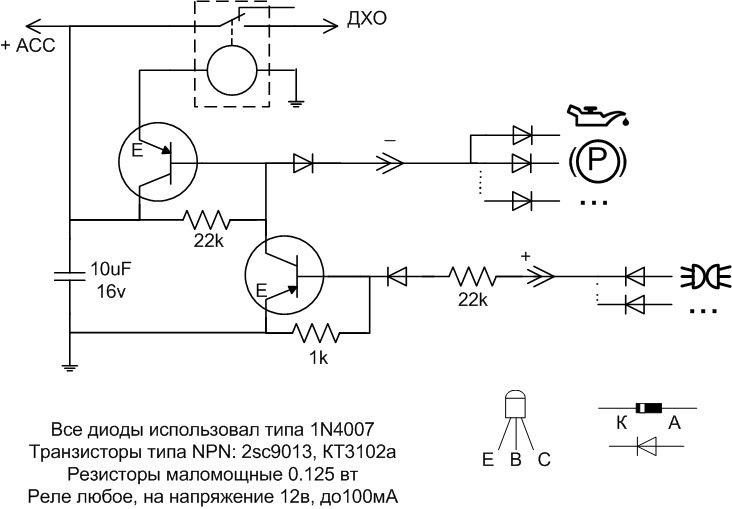
In my version, DRL is turned on through a small relay so that you can turn on the average load.
The relay is activated provided that
-Machine is running (oil pressure lamp is off)
-On the street it is light — The light is off (dimensions are not included)
-Machine can move (handbrake down)
when any of the conditions changes, the light goes out.
You can add a bunch of conditions such as the generator is charging (the charging lamp is off), a person is fastened on, the tomosuh lamp is on, doors are open, etc … … in general, any lamp on the tidy or somewhere else that you like.
DRL itself took the power from the ignition switch because it’s not necessary for him to spend at least some energy when the ignition is off. The whole circuit is the size of a standard relay, the biggest part is the relay. I soldered everything by mounting around the rail. He poured hot glue and shook it with electrical tape. This miracle was placed behind the dashboard, to the wires of which everything was connected.
All signals can be combined by separating them with diodes, operate on a different signal + or -, the disappearance or appearance of the signal.
At one time I did some of these things, distributed them to friends — everyone is still happy, everything works.
User feedback
It works stably; it does not particularly react to voltage ripples. On a wound-up car, it shines when driving, and does not turn off by itself. Once the oil pressure lamp began to blink, well, and DRL along with it. Well, you don’t need to drive with this problem, because the engine can become bad.
And so I rejoice some kind of automation sat down and went without hesitation.
Once such a miracle happened once — it did not always turn on, and then it stopped completely. I disassembled (removed the wound electrical tape), picked up hot glue and everything turned out to be very banal — it did not solder the relay power properly and this contact dropped from the shaking. Soldered in a good way, now it is working again.
Thanks overpowered this volume bukaf))
Comment, click like, ask.
Установка ДХО
Долгое время не получалось заняться установкой дневных ходовых огней, и вот наконец-то выдался денек. Ничем подобным раньше никогда не занимался, поэтому попросил помощи у своего соседа, так что спасибо ему!)) И спасибо человеку, который выложил на YouTube видеоролик по установке ДХО, оттуда я и взял схему подключения, и по-моему просто ГЕНИАЛЬНУЮ схему! Без каких-либо реле и лишних прибамбасов (ссылку на видео оставлю в конце записи). Наверное это лучший и наипростейший способ, я просмотрел множество других обзоров, но этот удивил своей простотой и наглядностью. Требовалось, чтобы при включении габаритов/ближнего света — ДХО выключались.
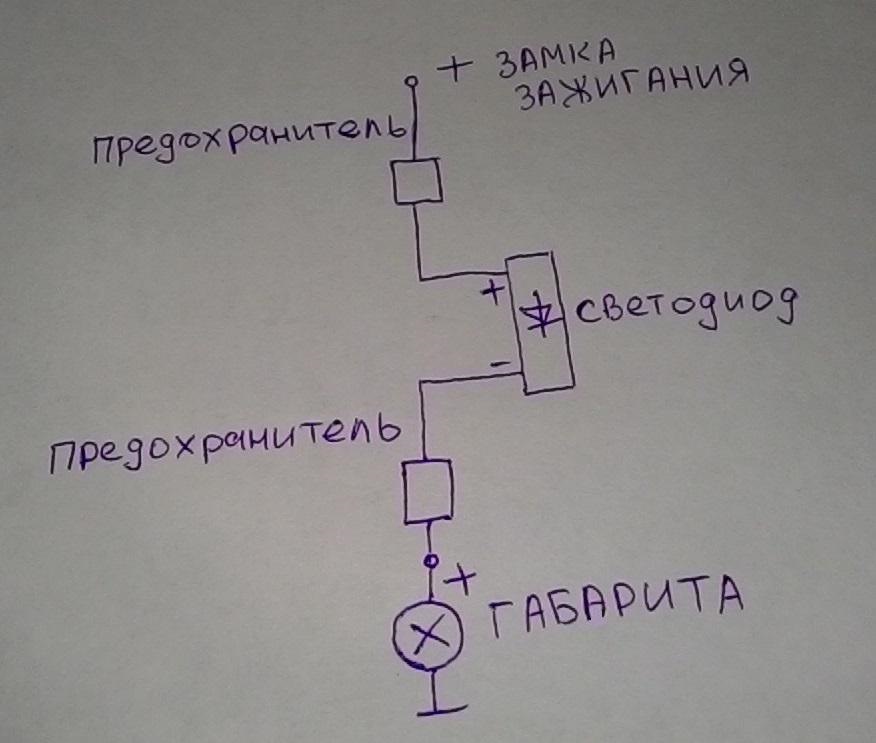
Что происходит по этой схеме: при включении зажигания — загораются дневные ходовые огни (при выключении — гаснут), если включить габариты – погаснут ДХО и загорятся габаритные огни.
Схема основана на использовании свойств светодиода, который пропускает ток только в одну сторону. В этой схеме, при подаче "+" на "-" светодиода(при включении габаритов), работать он не будет.
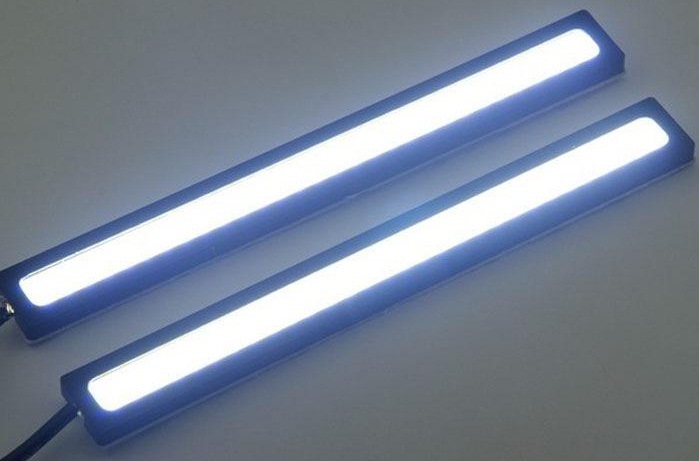
ПО ПОВОДУ САМИХ ДХО, мне их посоветовали в магазине, стоимость 580 рублей — якобы светят хорошо. Обычные дешевые китайские огни с металлической окантовкой, клеятся на двухсторонний скотч. Их яркость мне пока трудно оценить, в процессе эксплуатации будет видно.
КУДА КЛЕИТЬ ДХО?
Это была наверное самая главная проблема, на ВАЗ 2114 корпус переднего бампера имеет очень интересную округлую форму, которая не позволяет клеить жесткую планку с диодами. И вопрос, куда девать провод? С проводом смотрелось бы куда более колхозно.
Всем Привет!
В этой статье речь пойдет о Дневных Ходовых Огнях которые можно сделать из стандартных противотуманок. Причиной стало то, что очень много приходится ездить за рулём и постоянно нажимать на кнопку надоело да еще и на Samaraх нет индикатора включения на ближнем свете, почему? загадка.
На реализацию уйдет не более десяти минут, всё очень просто:
1. Вынимаем две кнопки из панели (Кнопка включения габаритов вместе с ближним светом и кнопку противотуманок)
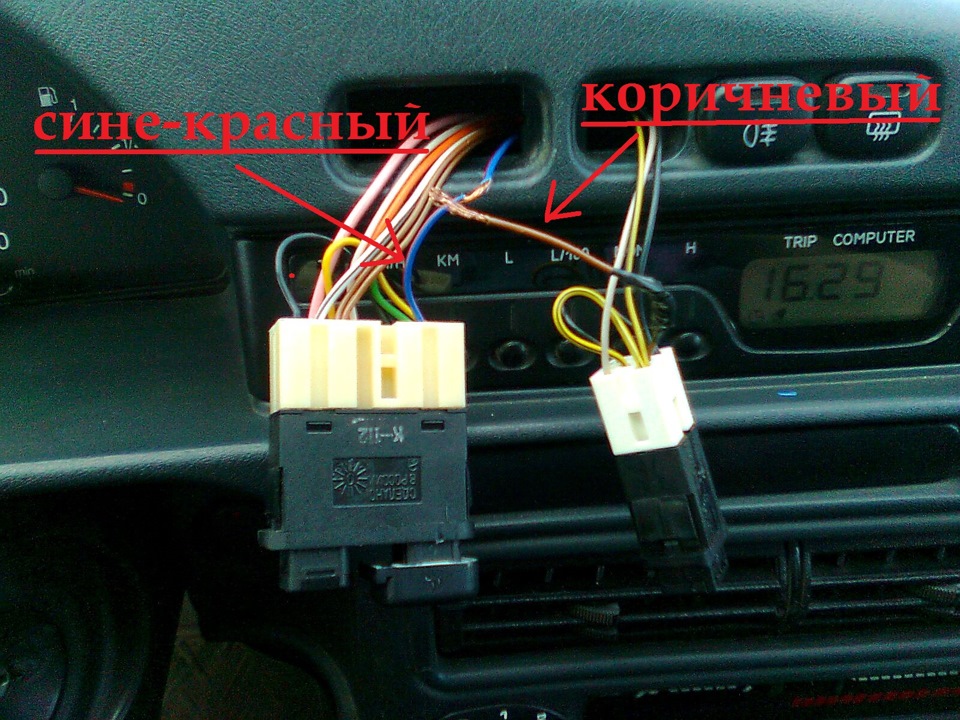
2. Оголяем сине-красный провод (полосатый) идущий к кнопке габаритов
3. Отрезаем коричневый провод (идущий к кнопке ПТФ)
4. Ту часть коричневого провода идущую от кнопки(!) ПТФ соединяем с сине-красным проводом.
5. А ту часть отрезанного коричневого провода который шел к кнопке ПТФ изолируем.
Вот и всё. Что мы получаем: при нажатой кнопке ПТФ туманки будут включаться и выключатся с зажиганием.
Габариты при этом будут выключены(!) но как мы знаем ПДД это не запрещает.